Making face armature
- Jan 28, 2021
- 7 min read
Updated: Jan 31, 2021

Face armature is one of the most challenging things in puppet making, since it’s so small, it has to make very subtle movements and requires knowledge in miniature mechanics. That’s why many stop motion productions prefer using 3d printing. But it is possible to achieve a nice range of facial expressions with relatively simple techniques just by using aluminum wire.
The key here is accuracy. Everything should sit exactly in place, a displacement of a millimeter here or there can affect whether the armature will work or not. If it’s too close to the surface, to the "skin", it can be shown through the translucent silicone or it can even tear the silicone and protrude out, and if it is too much inside, the silicone creates resistance and the armature won’t respond well.
A transparent mold can help to see the armature location inside during casting, but if you prefer working with plaster molds like me, sometimes it can take several attempts to succeed.
Materials:
- 0.5 mm aluminum wire
- 1 mm aluminum wire
- A small block of wood (I used about 3X5 cm length and 1.5 cm width)
- Square aluminum tubes in two follow sizes (that one of them can hardly get inside the other)-
the thinner one should be the same width as the neck tube of the body armature.
- Two parts epoxy glue
- A plaster mold for the puppet head (instructions here)
- Beads in the same size as the eye balls (I used 10 mm)
- acrylic paint in flesh tone
- Silicone for casting – I use PlatSill Gell 00 or Dragon Skin 00 + Slic Pig tint
Tools:
- A Dremel or a utility knife that can carve wood
- A driller + small drill bits – around 1-2 mm
- A fretsaw
- Pliers and a Cutter
- A file and sandpapers
- Clasps that can hold the mold
Instructions:
1. Prepare the mold
Brush two thin layers of silicone (don’t have to be tinted) inside both sides of the mold. It will protect the mold from damaging and will make the measurements more accurate.

2.Cutting the wooden block
The block’s size should be slightly smaller than the height and width of the upper half of the head.
It should end about 2-3 mm under the mold’s eye sockets.
Measure it inside the mold. Cut the wooden block using the fretsaw, then cut the corners a bit and sand them to be more rounded, so they won’t damage the mold and the silicone later.

3. Eye sockets
Measure the size of the beads for the eyes and draw circles in the same size on top of the wooden block (it is best to leave about 2 mm from each side). Also pay attention to the distance between the eye bolls according to the mold.
Creating the holes can be done by a Dremel - preferably first drill a hole with a small drill in the center of each circle and then continue with the Dremel using a round head. You can also carve them with a knife – maybe slower and less accurate but without the smell of the burnt wood.
The beads should sit inside the sockets about half way.

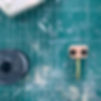
4. The tube for the neck
Measure the height of the wooden block and add about 5 mm to it. Cut the wider aluminum tube to this size.
Put the wooden block and the beads inside the mold in their place and close it. Flip the mold so the neck hole will be on top. Mark or draw a dot through the neck hole in the center of the bottom of the wooden block. Now take it out and drill a hole in the place you marked. Put the tube inside it. You can use a file to enlarge the hole until the tube fits inside almost to the end.
At least a few millimeters of wood should remain so that the tube doesn’t come out from the other side. The tube shouldn’t protrude from the wood more than 1 cm.


Use the epoxy glue to attach it inside the wooden block. Be generous with the glue but pay attention that there is no glue inside the tube, only around it. Wait until it’s set.
Now cut the thinner tube about 10-20 cm long and stuck it inside the wider tube you glued to the wood. You can use it to hold the armature, especially during casting.
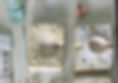
5. The eyebrows
Drill a small hole (less than 1 mm width and 1cm depth) about 2mm above each eye socket in the middle of each one.
Cut the 0.5 mm aluminum wire to two pieces of about 25 cm length. Put them together on one end into the driller and hold stretched on the other end with a plier. Gently run the drill until both wires turn into a braid. You can also make it with two pliers instead of the driller – each plier on every end, and twist one of the pliers until you get a braid.
Fold and twist the braid to make two T shapes. The upper part should be about the same width or a little wider than the eye sockets. Make the bottom part about 2 cm length. Put the bottom end inside the holes you drilled in the wooden block, and put it all along with the eye beads inside the half mold of the face.
The wire eyebrows should touch the inner surface of the mold where the puppet eyebrows will be. Shape them according to the shape of the eyebrows in the mold. Check if the mold closes well. If not make the bottom part of the wire (that goes inside the wood) shorter until it fits.
Then attach the wire eyebrows inside the wooden block with the epoxy glue and wait until it’s set.


In the middle picture you can see the eyebrows from a different angle.
6. The jaw
Make a braid the same way, this time use the 1 mm aluminum wire. Drill two holes in the bottom part of the wooden block (on both sides of the neck), close to the outer edges, leave about 2 mm from each end.
Shape the wire as a U shape and put each end inside the holes. Measure it inside the mold. It should touch the inner surface of the mold, more or less in the middle of the puppet’s chin, but it shouldn’t touch the surface on the sides where the cheeks will be. Check if the mold closes well, if not make the wire shorter until it does. Then attach the jaw wire inside the holes of the wooden block with the epoxy glue and wait until it’s set.
7. The upper lip
This part is not essential because the jaw wire can be enough to open the mouth. But if you manage to install it in the right place it can give the puppet a bigger range of expressions and even make lip sync with it (well more for longshots, less for close ups).
Drill 2 holes in the middle lower part of the wooden block under the eyes (leave about 2 mm from the bottom end) with about 1 cm distance between them two. Make another braid from the 0.5 mm wire. Cut it to about 4-5 cm length. Shape it as a U shape. Stick each side of the wire to the holes and put it all inside the mold. This wire should touch the inner mold surface where the upper lip will be.
Check if the mold closes well, if not make the wire shorter until it does. Then secure the wire to the wooden block with the epoxy glue and wait until it’s set.


8. Cheeks
The cheek wires can allow the puppet to smile. It does not always work and depends on the structure and size of the puppet's mouth. But usually at least you can get half a smile. If your character doesn’t smile then you don’t need them.
Use the remaining wire braid from the upper lip or make another 0.5 mm wire braid. Make two U shapes of it but pin each one at the edges and wrap it to itself, something like a balloon shape.
Drill holes in the bottom part of the wooden block, above the jaw on both sides near the wooden block edges. Stick each wire to each hole and put it all inside the mold. Shape them to touch outside the corners of the mouth in the mold.
Again, check if the mold closes well, if not make the wire shorter until it does. Then secure the wire to the wooden block with the epoxy glue and wait until it’s set.


9. Casting
Remove the silicone coat from the mold and clean it.
Paint the armature you built (especially the wires) with acrylic paint in flesh tone and wait until its dry.

Make some silicone tinted with flesh tone and brush 2 thin layers inside the mold. Also brush 2 thin layers on the wires of the face armature. Let it set completely.
Place the armature (face down) and the eye beads inside the half mold of the face. Make sure every wire sits in the right place. Take your time here and try to be as accurate as possible. In this stage you wish you had done a transparent mold.


Take the armature out, make some more silicone and pour it inside the half mold. The silicone should cover about half of the mold’s height. Now place the armature inside it and make sure it doesn’t move in the silicone. You can put something small and heavy on top of it, but not too heavy that the wires won’t squash. Try to place it in the upper part of the head, to make the eyebrows touch the surface of the mold. Wait until it sets.

Make more silicone for the rest of the mold. Pour it inside to cover both halves and quickly close the mold and place it with the hole of the neck facing up. Put clasps on both sides of the mold to close it tighter and pour the rest of the silicone through the neck hole. Wait until it sets.
Now comes the big moment – to see how it turned out. Open the mold and check the armature, if it works, everything in place and no wire sticks out - great, you did it! Go ahead and paint it. If not.. well, strip the silicone from the armature gently and cast again, and again, until it works.


This guy had problems during casting – the eyebrows were too high and the jaw too close to the surface. I had to strip the silicone and cast him again. Eventually he turned out fine.


Here you can still see the wires of the eyebrows through the silicone, but it’s ok, her actual eyebrows will cover it.


